
Canon(佳能)DSLR單反相機設定
參考以下指示來更改相機設定,以確保Ortery軟體與兼容相機之間的正確通訊
1. EF鏡頭設定
對於所有佳能EF、EF-S、EF-M鏡頭,進行以下設定:
1. 將相機對焦模式切換設置為自動對焦(AF)
2. 將影像穩定器Stabilizer設置為關閉狀態(當相機安裝在三腳架上或安裝在Ortery系統上時)


2. 相機電源來源
我們強烈建議在使用Ortery軟體時,使用變壓器為相機供電,而不是使用電池
3. 設定相機模式
將轉盤轉到「M」手動模式。

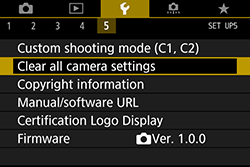
4. 清除相機設定
點擊系統選單中的「Clear all camera settings」,將相機重設為原始設定。
5. 選單設定
對於所有佳能相機進行以下設定:
1. 「Auto power off」設定成 Off 或 Disable

2. 「Auto rotate」設定成 Off 或 Disable

5. 確保相機處於拍攝靜態照片模式
6. 向下滾動以查看相機是否需要進一步的設定
佳能EOS Rebel T4i (650D) | EOS Rebel T5i (700D) | EOS Rebel T6i (750D) 相機
到左邊算起第4個頁面,選擇「Continous AF」並設定成「Disable」。

佳能EOS Rebel T7i (800D), 80D, 90D
1. 開啟預覽畫面
2. 開啟選單
3. 找到 「AF Method」 設定,並設定成 「Live 1-point AF」


針對EOS M6 Mark II及M50 Mark II相機設定
1. 將AF Method設置為單點自動對焦1-point AF


2. 禁用連續自動對焦Continuous AF設置為Disable


3. 將IS設定為OFF


4. 將AF Operation操作設置為單次自動對焦One Shot AF"

關於 EOS 6D
在短片模式下進入第五個相機選單設置選項,請選擇 「AF method」 再選擇 「FlexiZone」。

佳能5D Mark II
使用者必須變更Preview setting
1. 確保相機從電腦斷開連接 ->
2. 按下相機機身上的「Menu」按鍵 ->
3. 到左邊算起第6個頁面(第2頁tools) ->
4. 選擇並進入「Live View/Movie func. set.」


佳能5D Mark III
1. 到「Tools」選單並選擇「Record func+card/folder sel」
2. 確認Record func.設定成Standard


佳能5D Mark IV
1. 按下相機機身上的「Menu」按鍵
2. 選擇設定 「AF Method」 並設置成 「FlexiZoneAF」

較舊的相機型號:

佳能Rebel XT/350D, 20D以及EOS 5D單眼相機
將相機設定成「PC Connection」模式。
到第2頁tools選單將「Communication」設定成「PC Connection」(如下圖)。

佳能EOS 40D, 50D以及60D單眼相機
在「LV func. setting」選擇並進入「Stills only」或是「Stills+movie」

佳能Canon EOS 40D單眼相機,選擇並設定成「Exposure simulation」
1. 選擇C.Fn IV: Operation/Others 2. 在此選單選擇C.Fn. IV-7 Live View Exposure Simulation和-1: Enable(Simulates Exposure)

佳能Canon EOS 60D單眼相機
1. 到左邊算起第4個頁面 2. 選擇Expo. Simulation並設定成Enable
不知道該選哪台相機?
我們的技術人員能協助您選擇